Create the workflow
Open Workflows and press Create workflow.
The window Create new workflows opens.
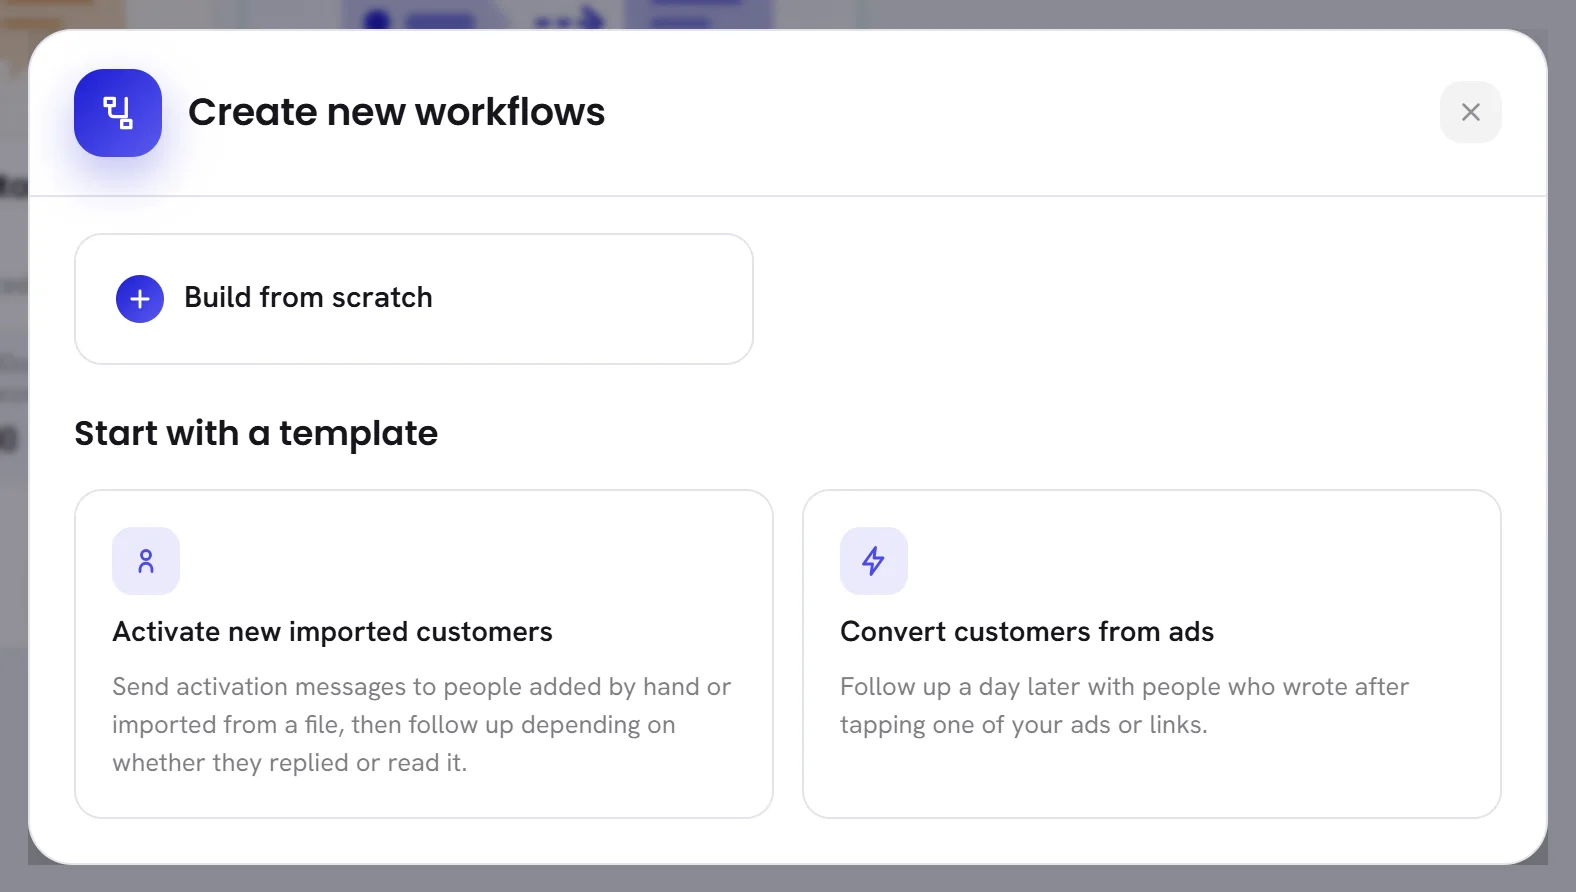
Choose Build from scratch, or one of the two cards under Start with a template.
The workflow is created at once and opens on its canvas. It is switched off, and named after the date and time, for example
202610051432-Workflow.Click the name at the top and type your own.
Up to 80 characters. The new name is kept the next time you press Save.
| On the screen | What it does |
|---|---|
| Build from scratch | An empty canvas. You add the trigger and every step yourself. |
| Activate new imported customers | For contacts added by hand or imported from a file. It sends a first template and waits up to 3 days for a reply. With no reply, it sends a second template: one for contacts who read the first, another for those who did not. A contact who writes to you leaves the workflow. Contacts you import arrive without consent, so they receive these messages only once their consent is recorded: see Consent and opt-outs. |
| Convert customers from ads | For contacts who reach you from one of your ads or links. It waits a day after the contact is created and sends one template. A contact added more than 3 days ago leaves without it. Its audience holds an empty Source rule: fill it in with the source those contacts carry, or the workflow cannot be switched on. |
A template arrives drawn and connected, with every Send templates block left empty: the words are yours, so you choose your own approved templates. With one WhatsApp number connected, that number is already chosen as the sender.
The canvas
A workflow is drawn from left to right. Each box is a block: the Trigger first, then the steps. A line joins a block to the one that follows it.
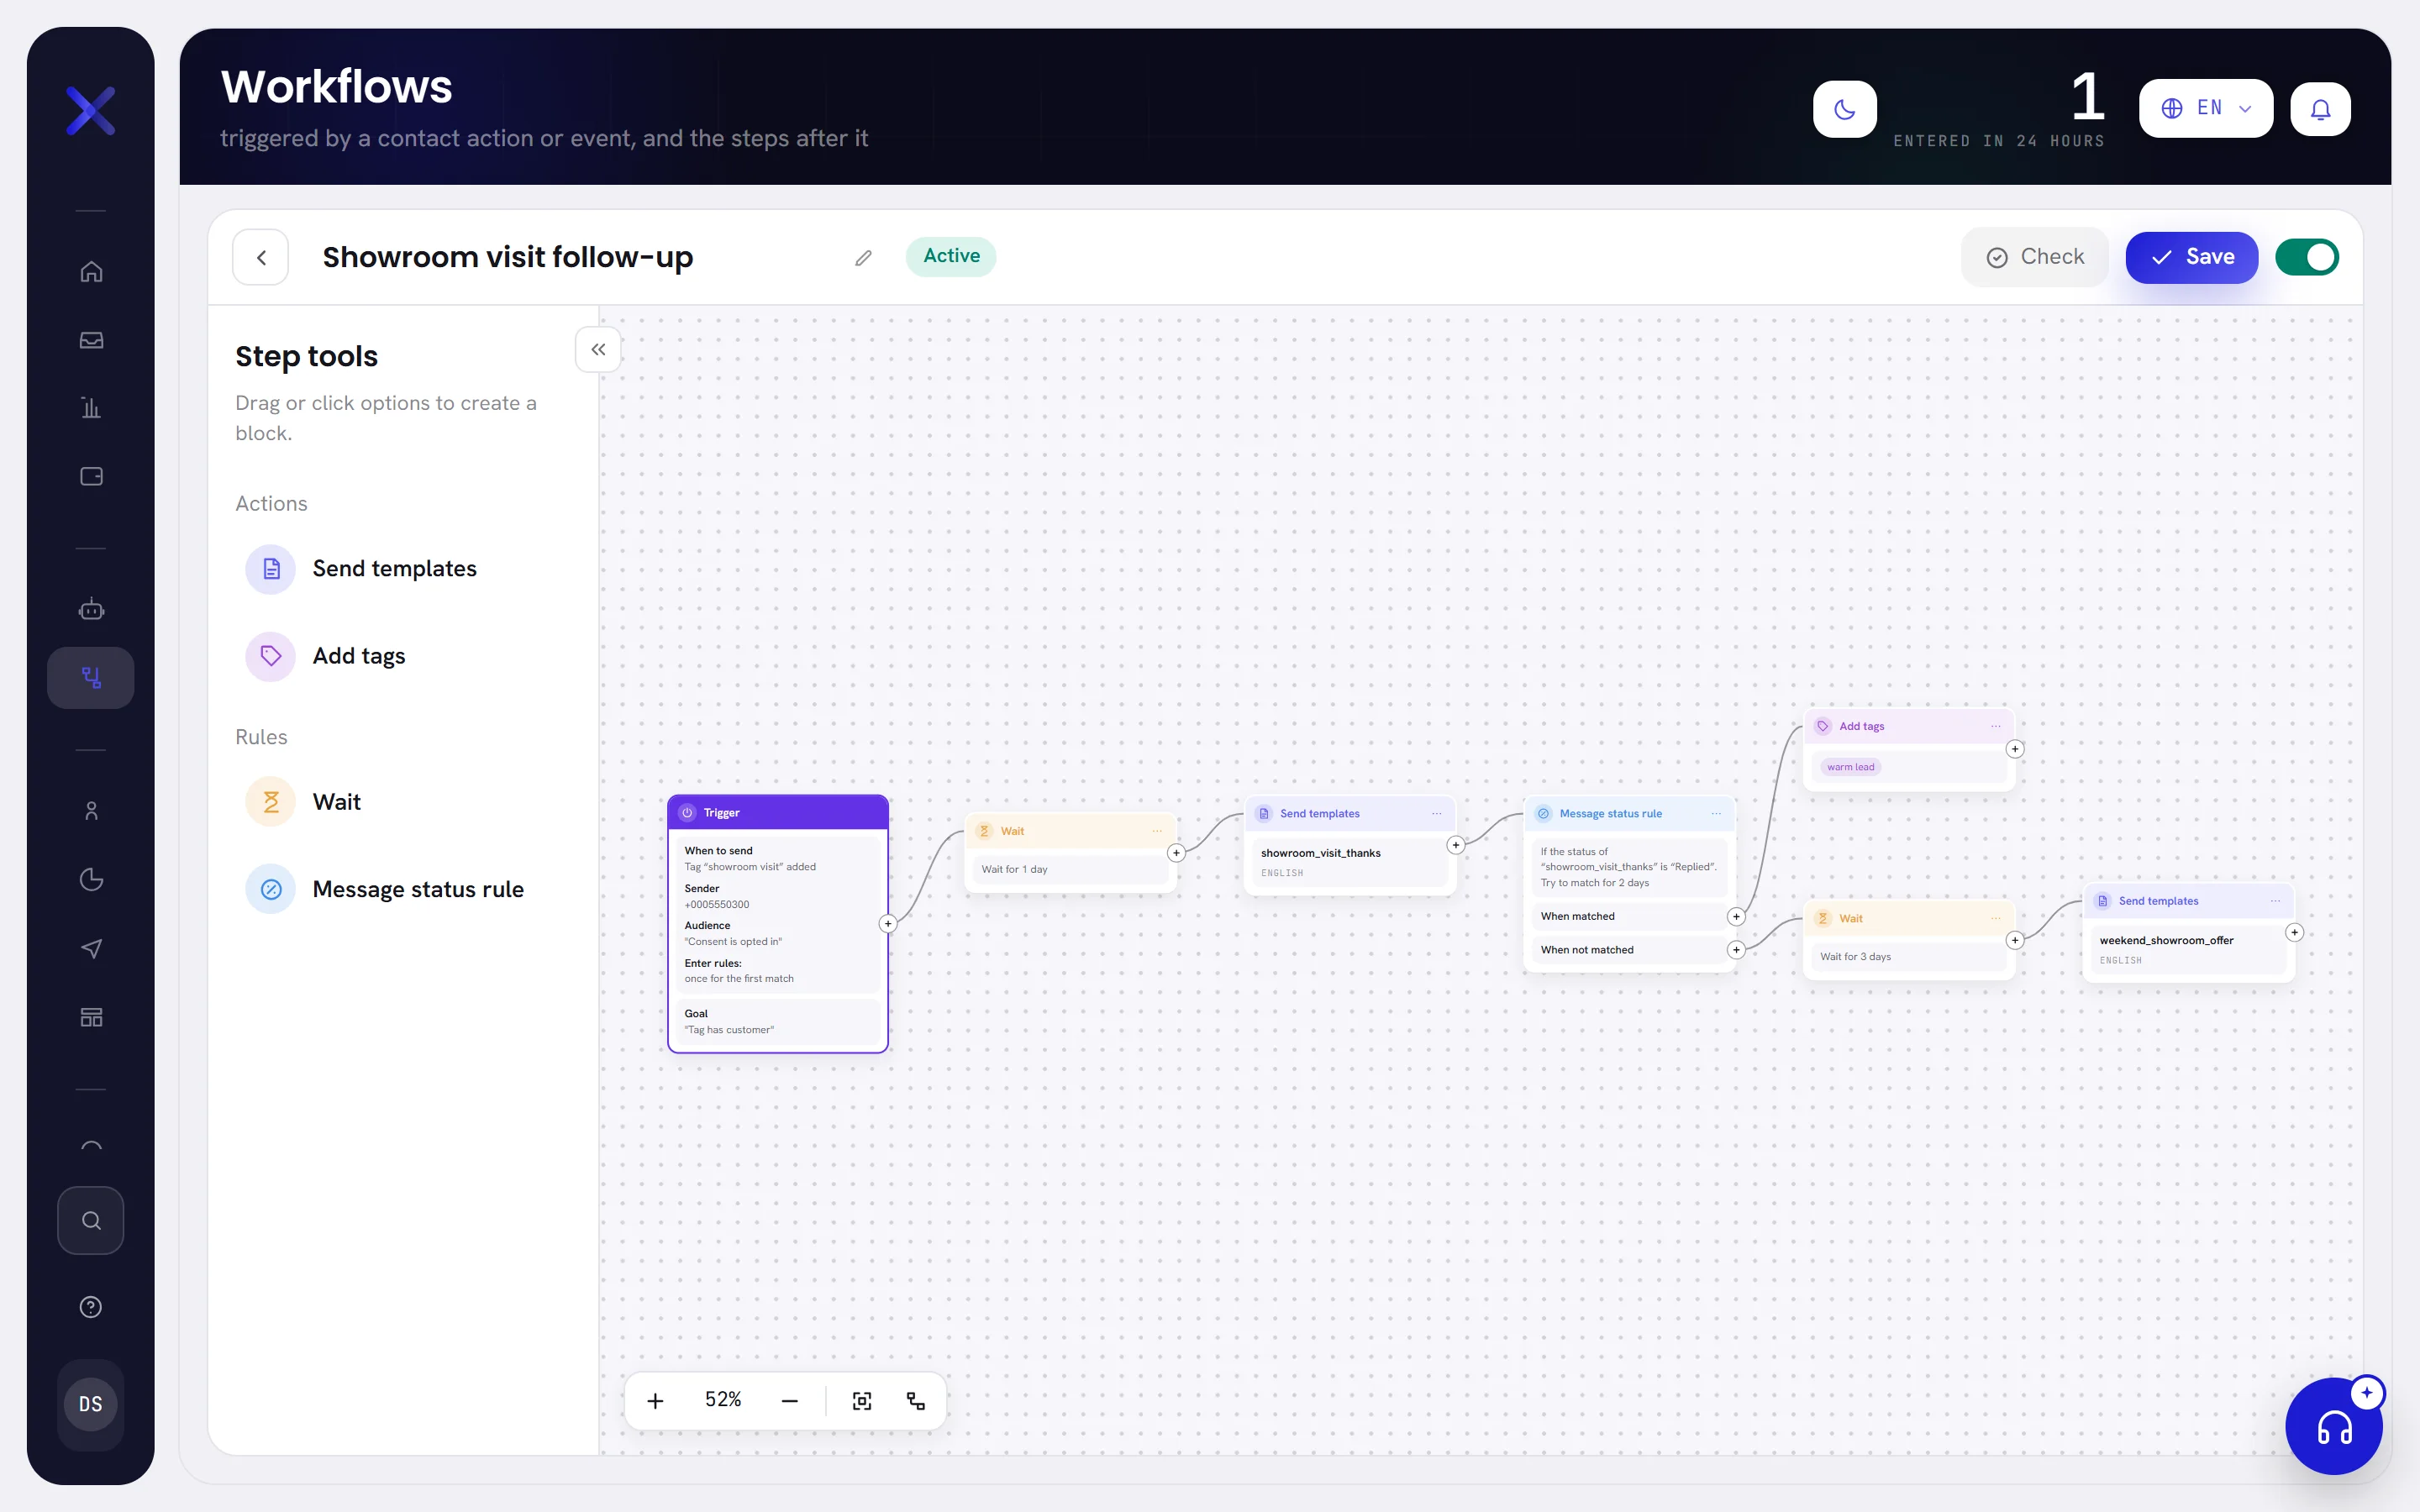
| On the screen | What it does |
|---|---|
| Back to workflows | The arrow at the top left. Returns to the list. |
| Workflow name | The name, in the top bar. Click it to rename the workflow. |
| Unsaved changes | Appears beside the name as soon as you change anything, and goes when you save. |
| Check | Lists what still stops the workflow from being switched on, without saving. |
| Save | Keeps the drawing and the name. Ctrl+S does the same (⌘S on a Mac). |
| Switch on | The switch at the end of the bar. It saves your changes first, then switches the workflow on. On a workflow that is on, it is Switch off. |
| Step tools | The steps, grouped by what they act on, each group folding away: Send templates under Messages; Update fields, Update tags and Update segment under Contact; Assign to a person under Conversation; Wait and Message status rule under Rules. |
| Hide step tools | The double arrow at the top of the step tools. Folds them away to give the canvas more room. Show step tools brings them back. |
| Zoom in | The plus at the bottom left. Makes the drawing bigger, up to 200%. The figure beside it is the zoom you are at. |
| Zoom out | The minus. Makes it smaller, down to 30%. |
| Fit to screen | Shows the whole workflow at once. |
| Auto layout | Tidies the blocks into neat rows. Ctrl+2 does the same. |
- Drag an empty part of the canvas to move across it. The mouse wheel does the same.
- Hold Ctrl (⌘ on a Mac) and turn the wheel to zoom where the pointer is.
- Drag a block to move it. Its lines follow.
Add the trigger
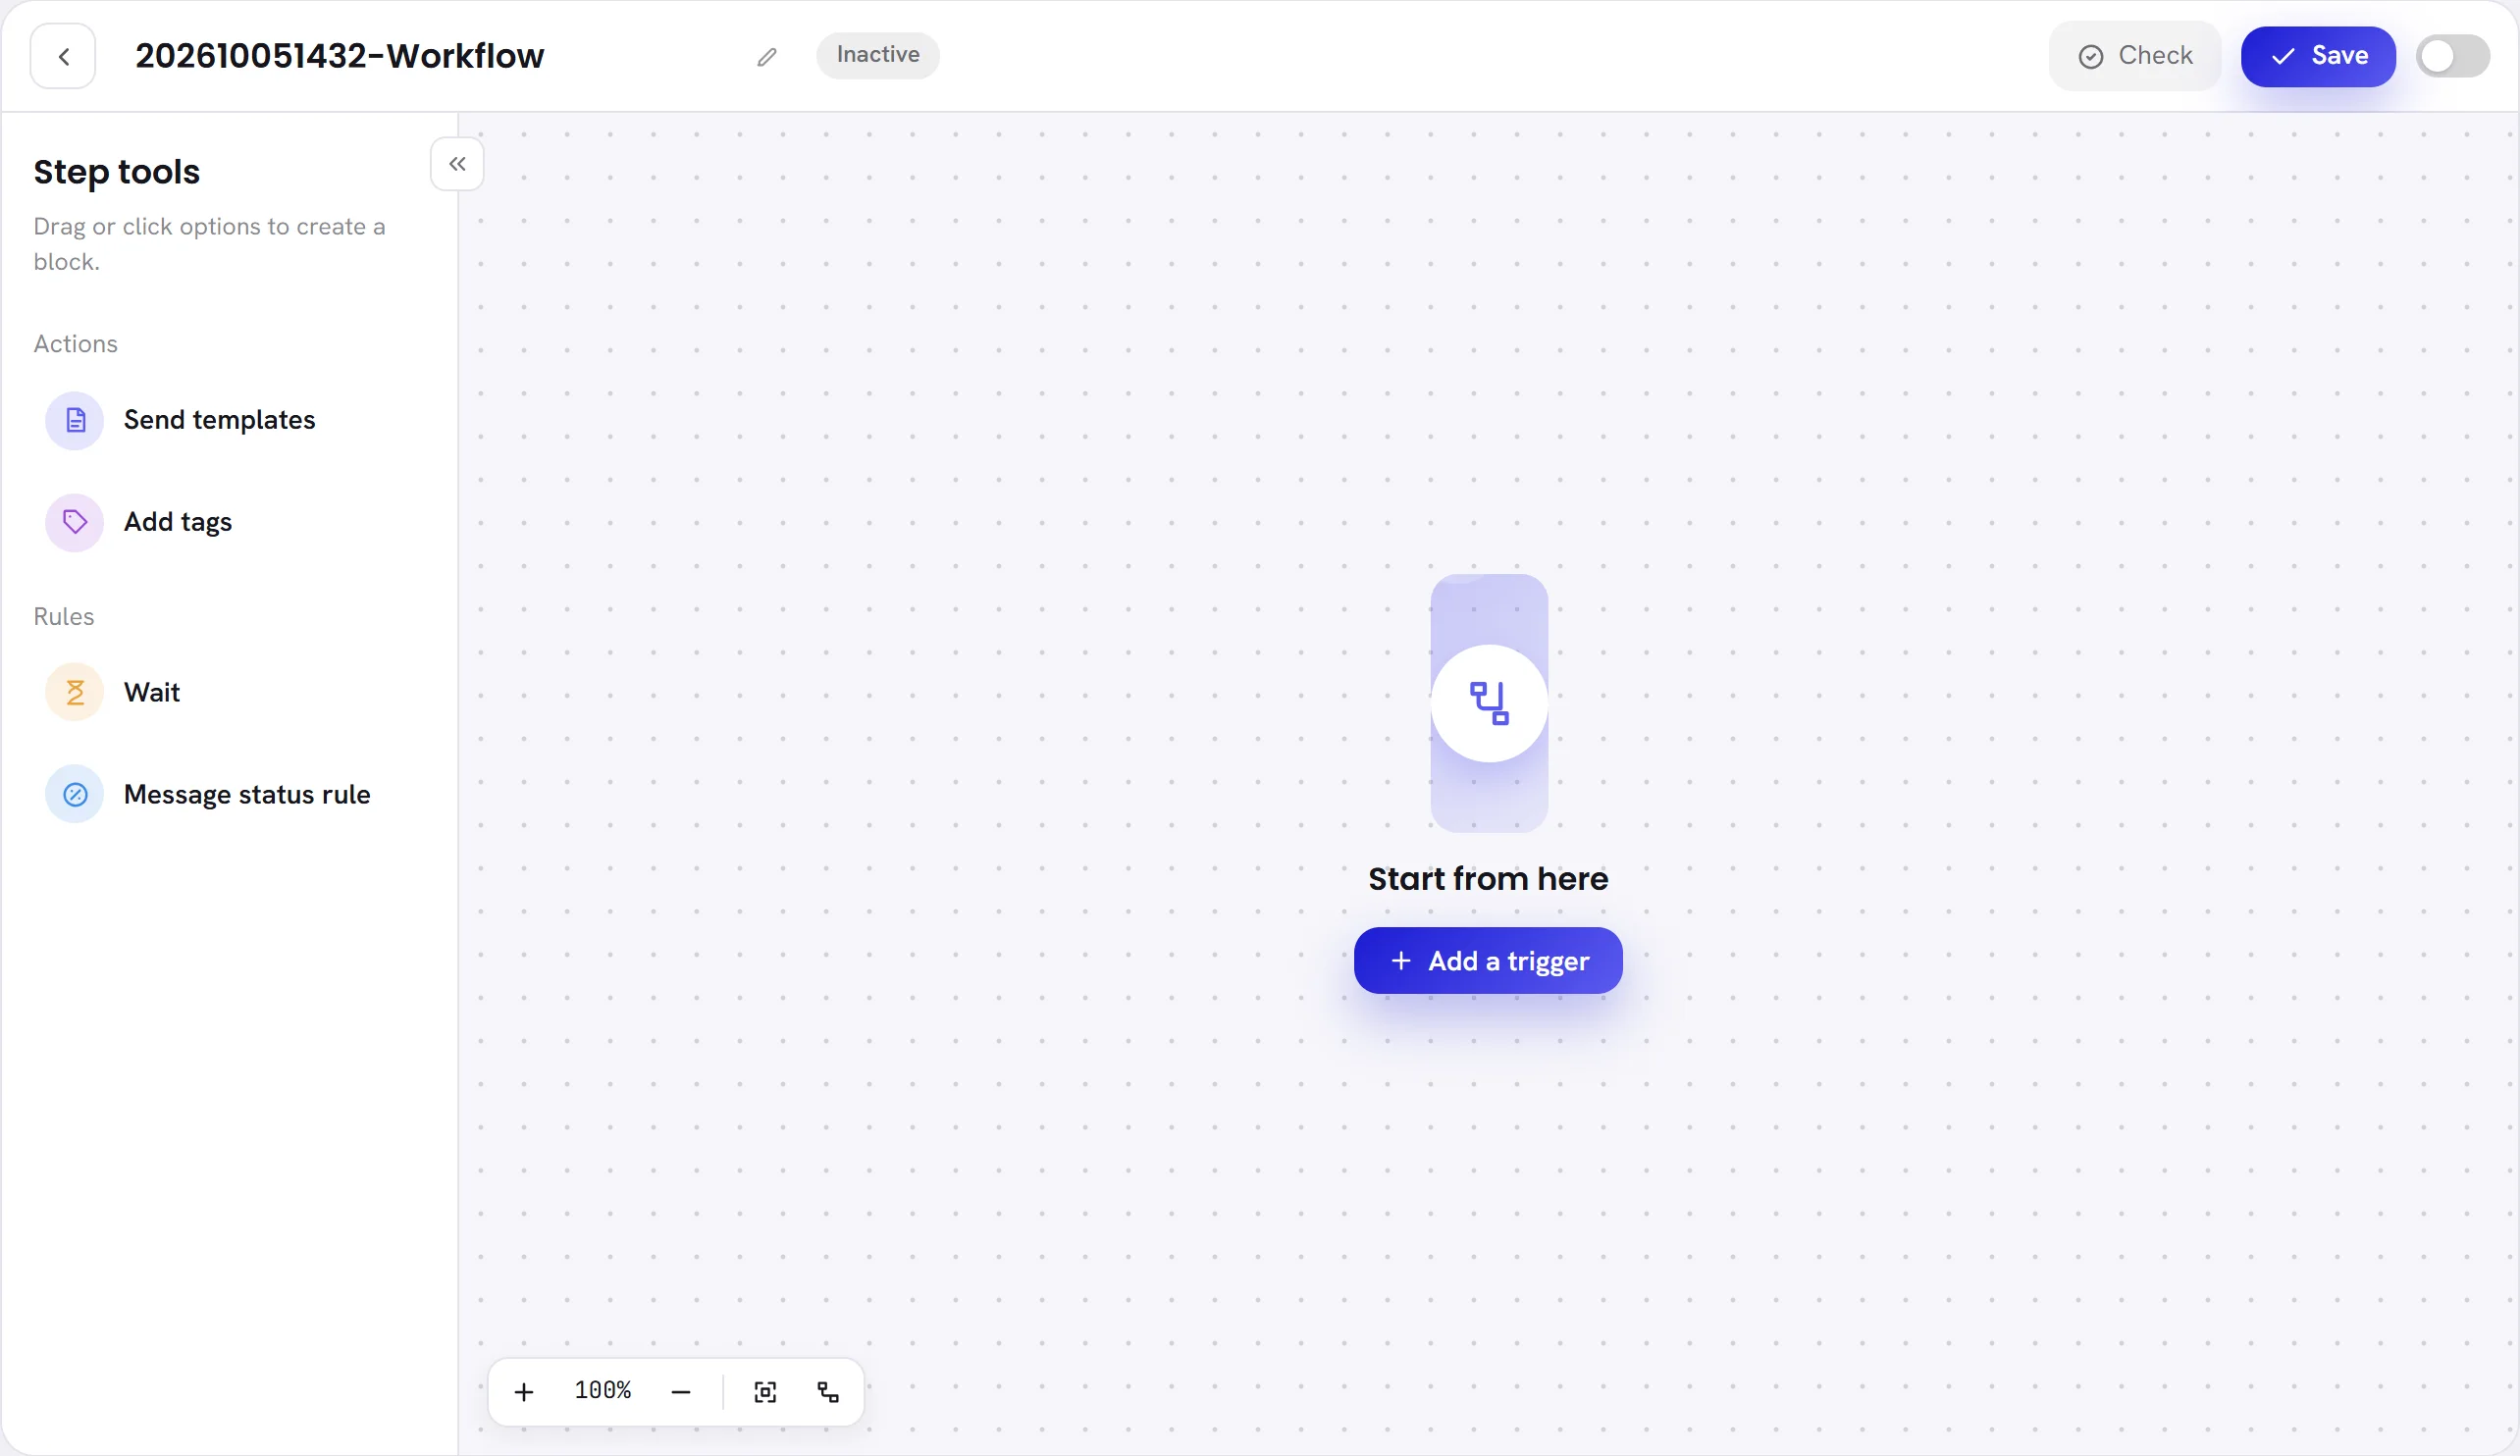
A workflow built from scratch opens empty, with Start from here in the middle.
Press Add a trigger.
The Trigger block appears and its panel opens. A workflow has one trigger, and it cannot be deleted.
Under When to send, choose what lets a contact in.
Contact created, Tag added or Date rule.
Under Sender, choose the WhatsApp number.
Every message of this workflow is sent from it.
Set who the workflow is for under Audience, if it is not for everyone.
The audience, the two filters, the exit rule and the goal are explained in Workflow triggers and steps.
Press Save at the foot of the panel.
The panel closes and the block shows your choices.
Add steps and connect them
Press the + on the right edge of a block.
A menu lists the four kinds of step.
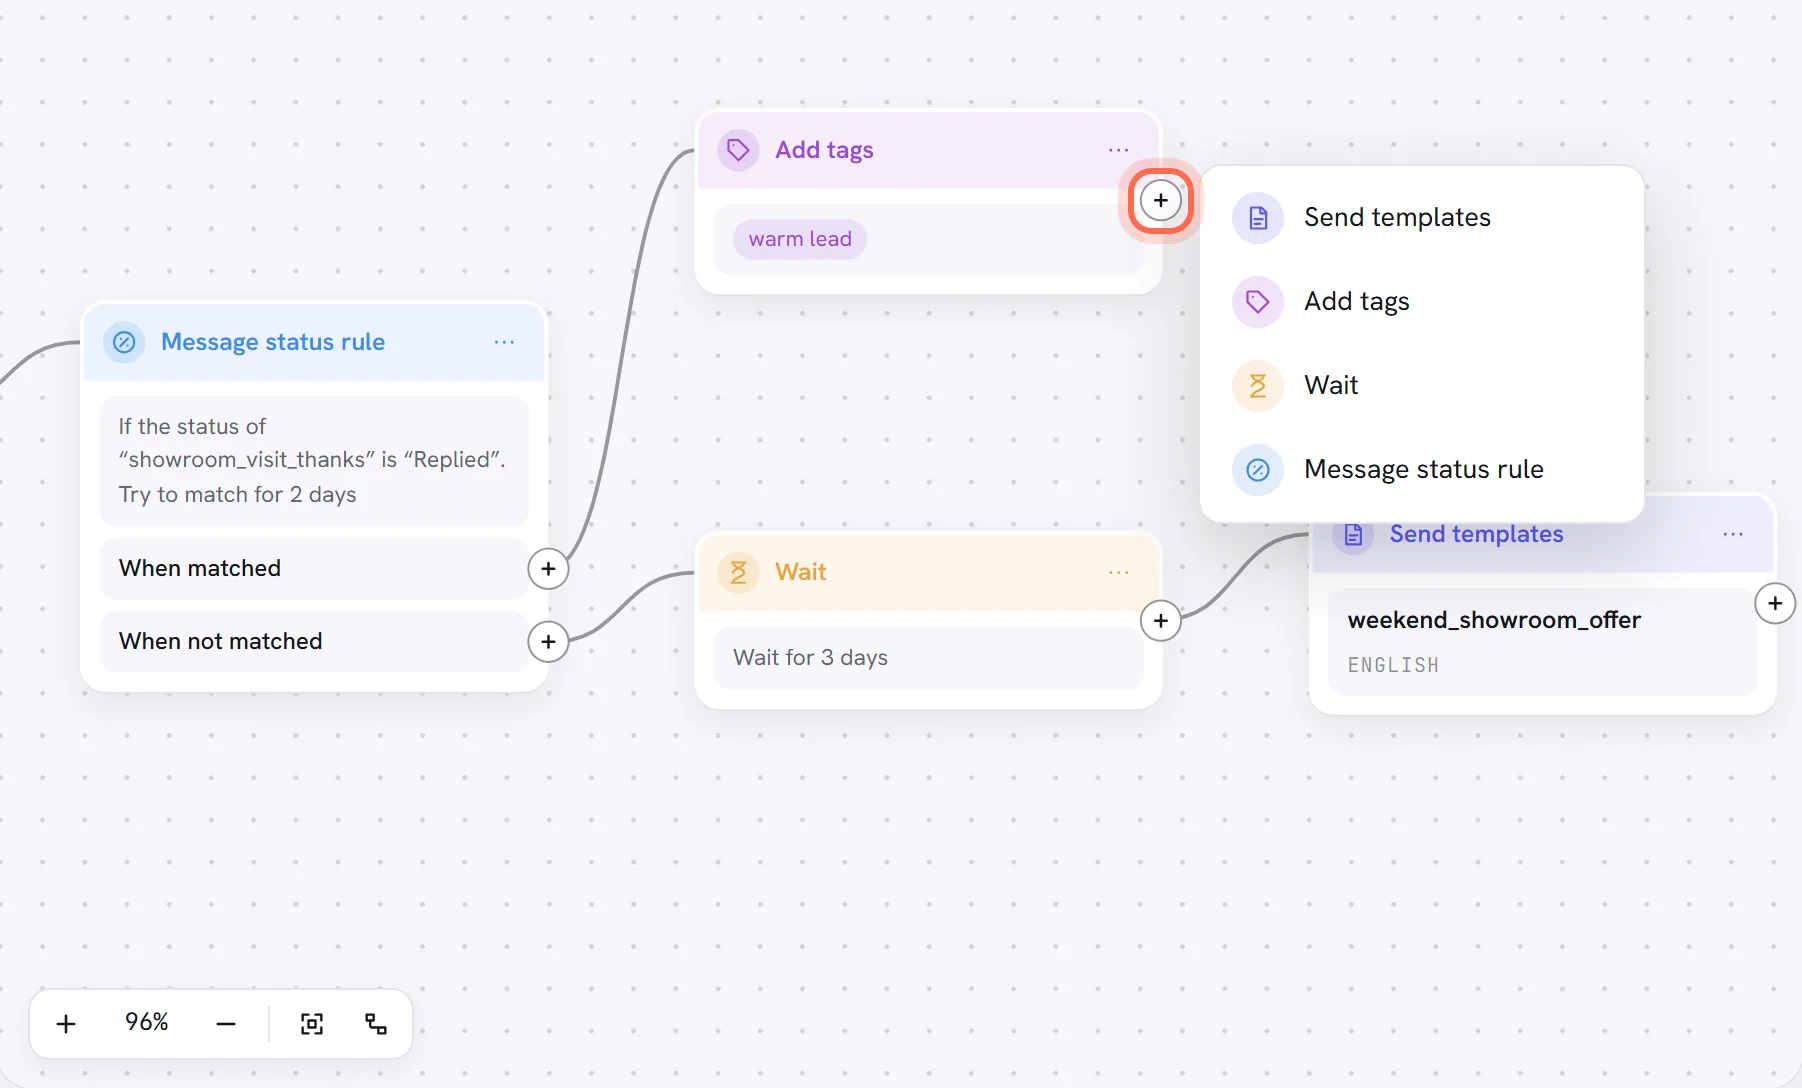
Choose a step.
It is added after that block, joined by a line, and its panel opens.
Fill in the panel and press Save at its foot.
What each step asks for is in Workflow triggers and steps.
Carry on from the + of the new block.
There are other ways to add a step:
- Click a step under Step tools. It joins the block you last clicked, or else the first free + after the trigger.
- Drag a step from Step tools onto a free + to join it there. Dropped anywhere else on the canvas, it lands unconnected.
- Press the + of a block that already leads somewhere. The new step goes in between.
- Drag from a + to another block to draw the line yourself.
The drawing keeps to a few rules:
- Each + leads to one block, and each block has one line coming in. Drawing a second line replaces the first.
- A line never goes back to an earlier block and never into the trigger, so a workflow cannot loop.
- A Message status rule has two +, When matched and When not matched. This is how a workflow branches. A + with no line means the contacts who reach it have finished.
- A workflow holds up to 60 blocks.
Change, copy or delete a block
Click a block to open its panel again. The three dots at the top of a step, Block options, open a short menu:
| On the screen | What it does |
|---|---|
| Edit | Opens the block’s panel. |
| Duplicate | Makes a copy with the same settings just below. The copy is not connected to anything. |
| Delete | Removes the block. If it had one line in and one line out, the blocks on either side are joined again. |
- The keyboard deletes too: click a block, close its panel, and press Delete or Backspace.
- Esc closes an open menu or panel.
- Deleting a Send templates block that a Message status rule was watching leaves that rule with nothing to check. It turns red until you choose another.
Save, check and switch on
Press Save in the top bar.
A workflow that is off is saved as it is, finished or not, so you can come back to it. The app confirms with Saved.
Press Check.
With nothing missing it answers Everything is in place. You can switch it on. Otherwise it answers Some blocks need attention. and how many problems there are.
Open each block outlined in red.
The number in its corner is how many things it needs. They are written at the top of its panel.
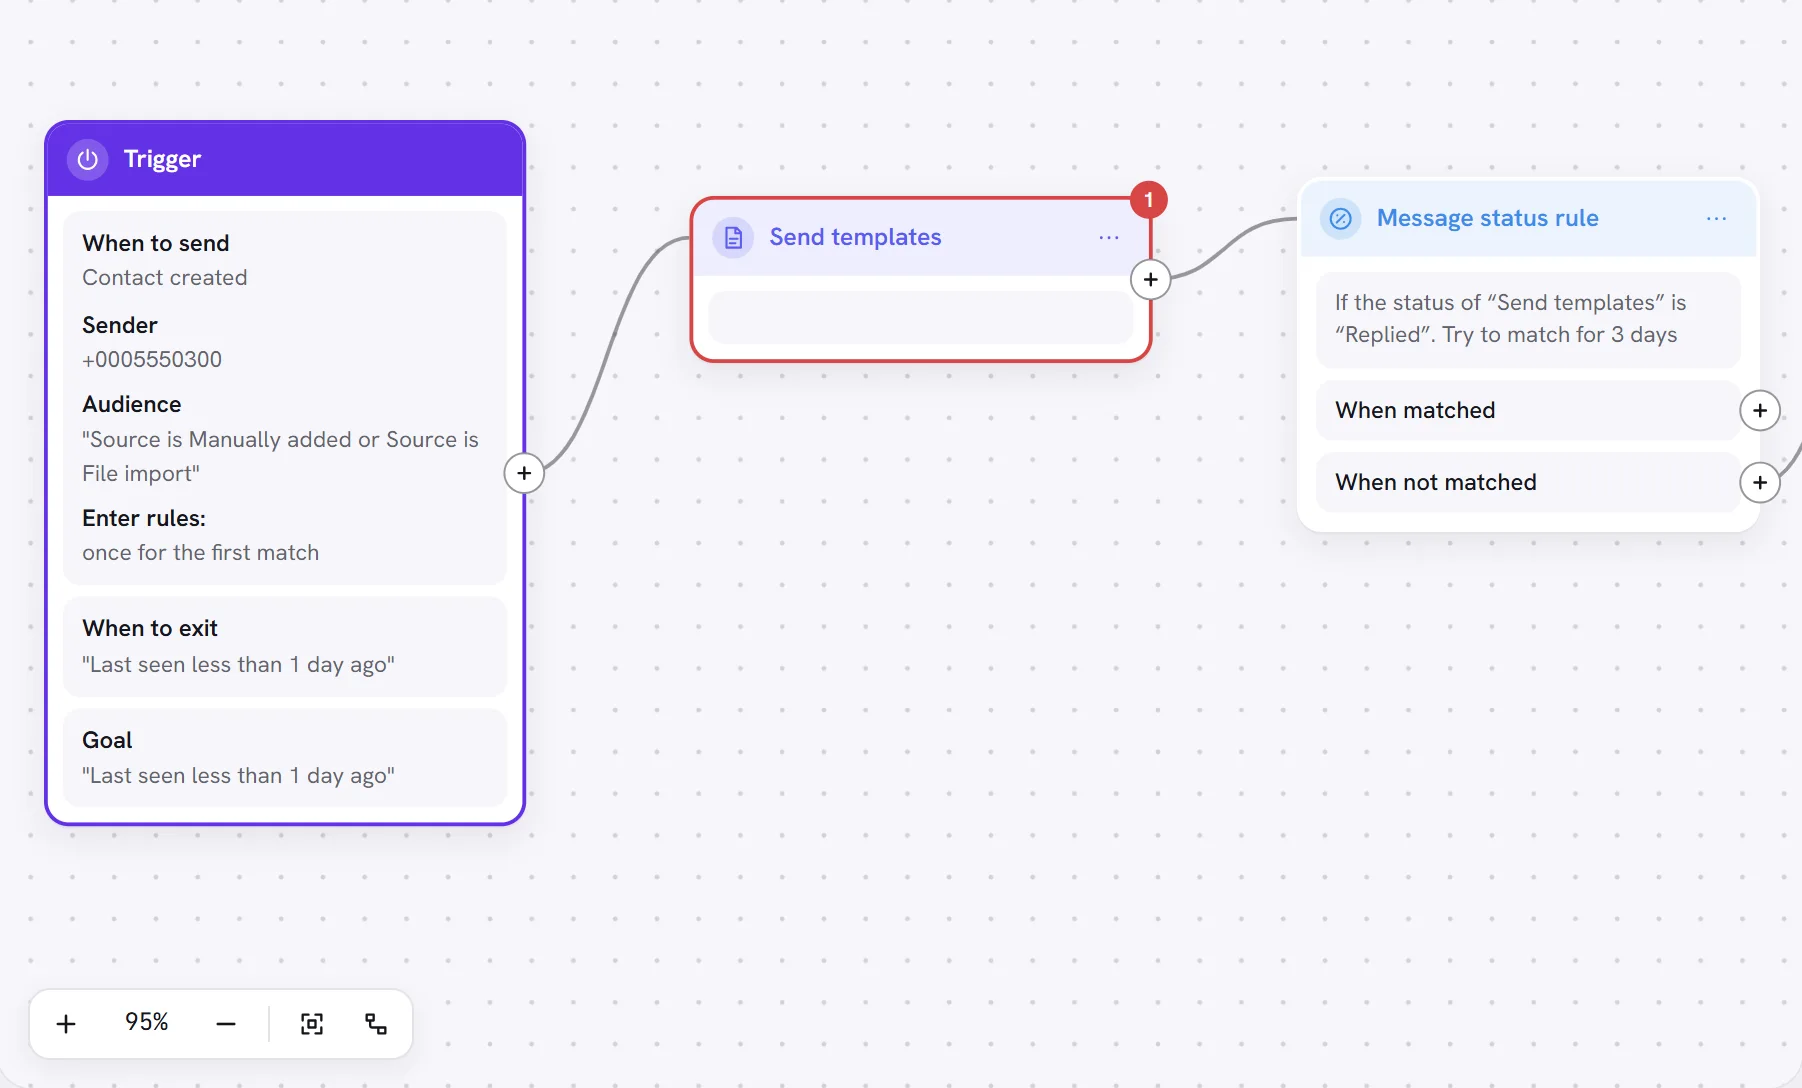
When the check passes, press the switch at the end of the top bar.
The workflow is saved, then switched on, and its badge turns to Active. From this moment the trigger lets contacts in.
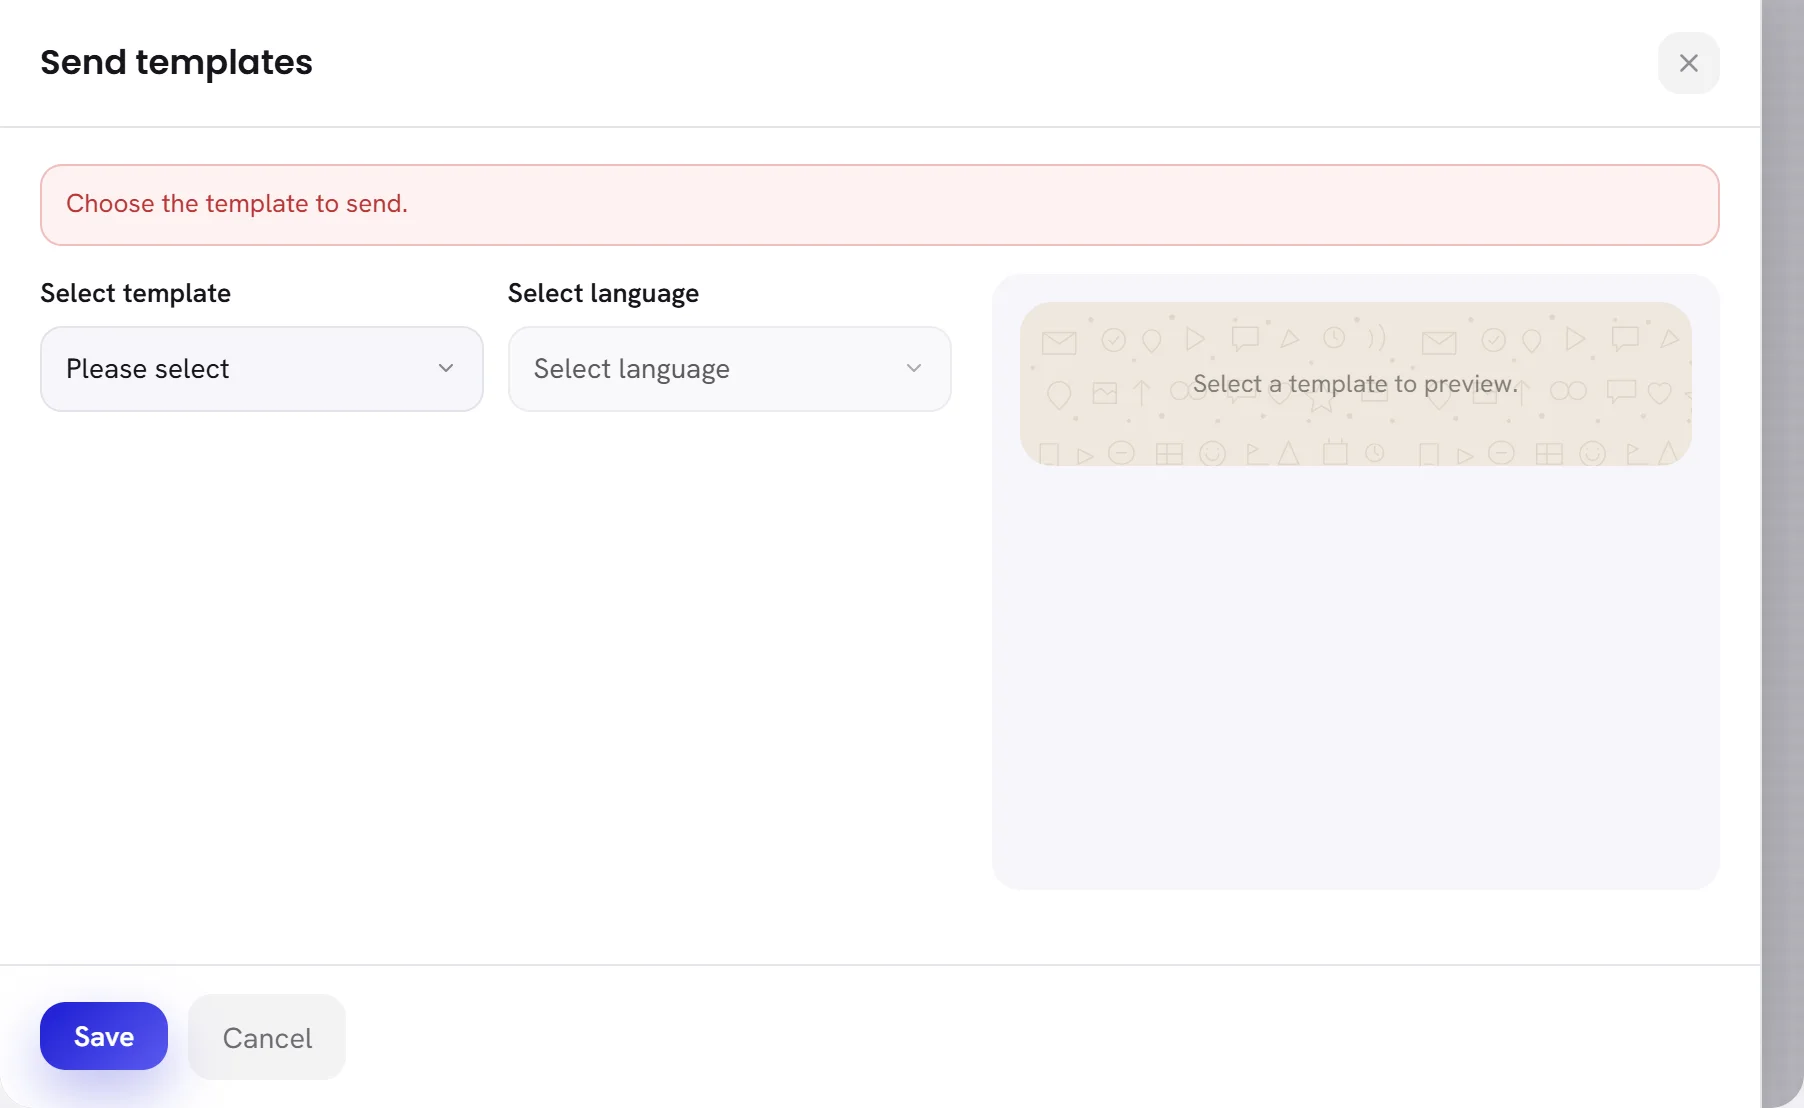
The editor draws the red outlines as you work, so most of this list is cleared before you press Check:
| What the editor says | What to do |
|---|---|
| Add a trigger to start the workflow. | The canvas has no trigger. Press Add a trigger. |
| Connect a first step to the trigger. | Nothing follows the trigger. Add a step from its +. |
| Not connected: nobody can reach this block. | No line leads to this block. Join it to the rest, or delete it. |
| Choose when somebody comes in. | Open the trigger and choose under When to send. |
| Name the tag that starts the workflow. | The trigger is Tag added with no tag. |
| Add the date rule that lets people in. | The trigger is Date rule with no rule. |
| Choose the WhatsApp number it sends from. | Open the trigger and choose under Sender. |
| The WhatsApp number it sent from is no longer connected here. | Choose another number under Sender. |
| A rule has no value to compare with. | A rule of the trigger has an empty value. Fill it in or remove the rule. |
| Choose the template to send. | A Send templates block has no template. |
| That template is no longer approved. | The template was deleted, or Meta no longer approves it. Choose another. |
| Upload the file for the template’s header. | The template has a picture, a video or a document at the top, and the block has no file for it. |
| Fill in every blank of the template. | One of the template’s variables has nothing to fill it. |
| Add at least one tag. | An Update tags block has no tag. |
| Set a time longer than zero. | A Wait or a Message status rule has no time. |
| Choose which template’s status to check. | A Message status rule has no template chosen. |
| The template it checks must be sent earlier on the same path. | The rule watches a template sent on another branch, or after it. Choose one sent before it. |
| Choose the status to wait for. | A Message status rule has no status chosen. |
Good to know
- A workflow that is on can only be saved when nothing is missing, because contacts are inside it. Otherwise the app answers This workflow is on, so it can only be saved without problems. Switch it off to save it half done. What changing a running workflow does to the contacts inside is in Run and follow a workflow.
- Leaving the canvas with unsaved changes asks Leave without saving? first. Leave anyway loses them.
- Switching on from the list works too. If something is missing, the canvas opens with This workflow has problems to fix first.
- When your plan does not include Workflows, a workflow opens to be read: Save is switched off. See Workflows overview.